
Retouching Gallery
If you prefer to shoot rather than spend hours in Photoshop, let our experienced retouchers take care of the post-processing... We can can clean up or totally replace backgrounds, add many kinds of special effects and help you get your images to your clients on schedule.

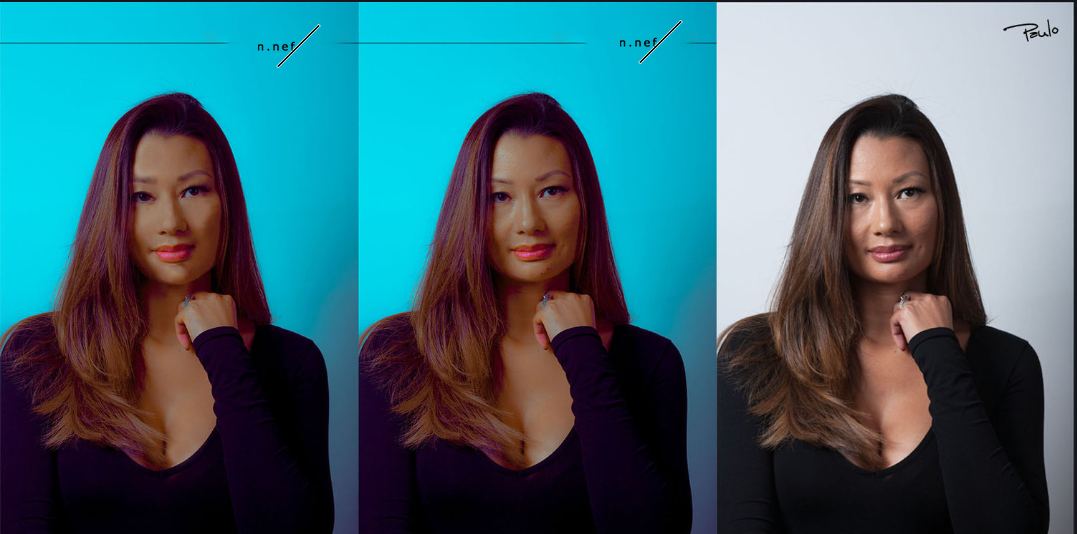
In this case, it was mostly about skin softening and extraction of color. I also defined a bit her face traits (I enlarged the opening edge of the eye, defined the eyebrow, cleaned the lip’s texture, sharpened the lower cheek). I also added some volume to her front hair and cleared it to let her wavy hair show more texture.
I enlightened the color of the clothes that the models is wearing and a beautiful and subtle indigo came out. I added some icons at the edge to close the image as an attractive clothing add.

I don't even have to mention the evident beauty of this model named Celeste. Yet the day she was portrayed, she had probably been having bad sleep, as you can tell in her non edited pic. Plus, you could tell she was probably quite exhausted by looking at the marked folds in the edge of her mouth, probably also as a result of dehydration.
So I erased the dark marks under her eyes and used the clone tool to rise briefly her cheek bones. I did the same thing with the small folds by her mouth. Covered a couple of minuscule pimples which were located at her chin and modified smoothly the shadows of her face so that the result was as natural as possible.
Afterwards, I started to work with the body, tho I have to say that I didn`t need to do much in this area. Personally, I consider single spots and random flreckless, a deeply attractive and realistic detail from the skin. So I put special effort on not affecting any of this marks.
Regarding the body, overall I tried to bring more uniformity to her skin, as some places had an slightly scratchy pattern, probably caused by her rubbing with clothes, furniture or whatever else.
I covered one tiny bruise she had at one of her quadriceps and erased some almost invissible strech marks from her upper part of the leg.
Lastly, I played with light and color in order to bring out a more matte result. I framed it with two simple empty rectangles with dark edges, each from one size - They had the same color of her hair.

This shoot was made by one of our most skilled models. Johanna put a lot of habilities regarding body exercise and motor coordination to give the photographer the perfect moment.
When she contacted me to edit her pics, the main requirement was that she wanted them to be in black and white. And so it is.
She also asked me to open the edges of the photo and to reproduce the smoke/flour/dust in order that the viewer was able to perceive the whole picture and its elements in a finished movement. I mainly used the cloning tool and a black background, althought there are other diferent ways to do it.
She did also wanted me to define her hair so that it wasn't lost in the process of transforming it into a black and white picture. She has a dark hair which would hide in the black background, but you actually can appreciate it's contour and movement.
Needless to say, that the result was so epic.
This editing exercise consisted mainly about guessing ways of retouching aging signs.

The process for elaborating this pic was obviously more complex and it took more time.
First of all, I edited and perfectioned the model's pic. I erased imperfections of her back bone and smothered a little bit her skin. I played a bit with lights, shadows and texture over her skin. Exalted some colors.
Then I went into do the cutting of the main subject from the final result; the model and her silhouette. So I had to be very precise at the edges. I used the pen tool to cut off the most defined parts of her (body and skin).
For the hair I used the mask tool in order to get the most efficient result I could. Still, I wasn't satisfied because it was not enoughly defined. I used a trick of combining the first result with the last result in order to get the best details of both. I considered that this time the result was fine enough, merge it together, save it as TIF format and went on to work with the background.
For the background, I used another raw pic because as the first pic was in this format, the difference of quality would be too evident and ugly when combining them.
When I had the pic, I started to adjust light, brightness, shadows, colors... I remembering applying a lot of contrast and plenty of shadows because I wanted to give the image an striking and kind of sinister look. When I thought both images would fit, I placed them together using layers.
I played with different positions and sizes for the model to locate and fit her on the stair case. I realized I had cut her silhouette together with one of her breasts profiled, so in her layer I used the eraser to take it off because even when I wanted nudity to be a relevant element to of the image, I didn't want for it to call all of the attention from the viewer.
In order to blend the images in one and in an stronger way, I used a quite big and very soft black brush; mostly over the top and left edges, also believing that it would look as a shadow which would have the effect of portraying an even more mysterious disturbing and darker look.
Finally, I blurred her gluteus line to put the focuss of the attention a bit higher and to make nudity be more of an insinuating element.
The goal of this exercise was to obtain an image which could be used as a cover of a thriller book.

I combined two different images in one. As you can appreciate, the wooden background of the model is replaced by the beach at her back. I brightened the beach pic a bit so that the result was blended and showing coherence regarding the lightning.
The trickiest part about it was to cut off the hair bits perfectly in detail. The effect is quite amusing and clean. This simple combination results in a very nice picture.